You are here: 1. Distribution System > 1.7. DEBTORS Menu: Debtors Ledger > 1.7.2. Debtors - Debtors Transaction Processing > 1.7.2.1. Creating a New Debtor Batch

Creating a New Debtor Batch

Nearly all debtor transactions - whether they be payments, journals, loyalties, levies or other transaction types - are processed in batches. A debtor batch can contain one or multiple transactions.

Batches can be held then recalled to add new transactions. You can print a verification report for the batch to check your entries without closing the batch. When a batch is printed, it is removed from Micronet and the batch number becomes available for another batch entry.


Technical Tip

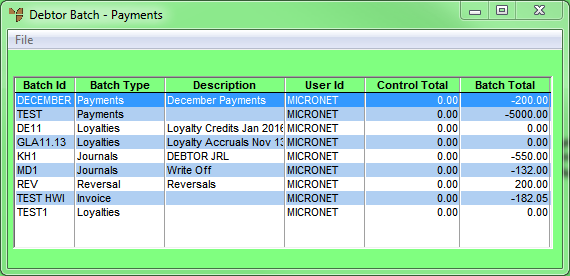
  • You can't view the transactions that have already been included in a batch. If you want to see those transactions, you need to print a verification report using the FILE | VERIFY option on the Debtor Batch screen.
  • When you save a transaction in a debtor batch, the debtor's account is updated immediately whether the batch is printed or not. You can't delete the transaction. If you have made a mistake, you need to reverse the transaction.

To create a new batch of debtor transactions:

  1. Select DEBTORS | DEBTORS TRANSACTION PROCESSING and then select the menu option for the transactions you want to process, e.g. DEBTOR PAYMENTS or JOURNALS.

Micronet displays the Debtor Batch screen for the selected transaction type, e.g. Debtor Batch - Payments or Debtor Batch - Journals. The Debtor Batch screen shows all current debtor batches for all transaction types as shown in the Batch Type field. You can only create batches of the batch type you have selected. For example, from the Debtor Batch - Payments screen, you can only create debtor payment batches.

  1. To create a new batch of the selected transaction type, select FILE | NEW.

Micronet displays the Add New Debtors Batch screen.

  1. Complete the following fields:


Field

Value


Batch ID

Enter a batch ID of your choice.Typically this would be your initials and a batch number, e.g. SD03.


Description

Enter the batch description. Use a meaningful description in case the batch needs to be held and recalled at a later date, e.g. "Payments for August" or "Initial Invoices by Stuart".


Control Total

If you want Micronet to check a control total for the batch, enter the control amount. Micronet compares this control total to the transactions entered and warns if the batch is being processed with an apparent out-of-balance total.


Bank Account

This field only applies to debtor payment batches and it is only enabled if the Change Bank Account on Payments field on the Debtors Configuration screen is set to Yes (refer to "Edit - Program - Debtors").

If this field is enabled, select the bank account where payments in this batch will be posted. If you don't enter a bank account, Micronet displays a message that it will post the payments in this batch to the bank account setup for debtor payments in the GL Interface master file (refer to "Edit - Debtors"). Select Yes to continue.

If this field is not enabled, Micronet posts the payments in the batch to that default bank account.

  1. Select the Accept button.

Micronet displays a screen where you enter the transaction details for the selected transaction type, e.g. the Debtors Payments screen or the Debtors Journals screen.

For more information about the different transaction types, refer to the following topics: